We might be a few months into our second year of marriage, but this year we got our very first Christmas tree!  Our new home needs a tree.  Clearly I had my priorities in the right order since the first order of business was to go purchase ornaments.  A couple years ago when we were registering for our wedding at Crate & Barrel I had seen a lot of cute ornaments.  Our first and only stop for ornaments was at Crate & Barrel.  Luckily for us there was a 30% off sale on all the ornaments!!  My husband and I filled up our basket with lots and lots of white, silver and red ornaments.  I was pretty sure we were buying too many, but figured we would return the ones we didn’t need.

It seemed like destiny as we drove up Massachusetts Avenue and right by a Christmas tree sale at the local church.  Instead of heading the Whole Foods or Home Depot to buy our tree we were going to get it from the church!!  They had a ton of options.  I am not really sure why we didn’t think of checking out the local churches in the first place.   At least we will remember this for next year!

After walking around the available “medium” size tree options a few times we quickly agreed on this guy:

Sorry for the crappy camera phone pictures.  It didn’t dawn on me to bring my camera … fail!  Anyways, after purchasing the tree we laughed a little at our lack of planning on how we were going to get the tree home.  It might have been December, but the convertible top when down and the tree when in the backseat of the car.  We made it home just before the rain started in.  Pretty good timing if I do say so myself.

We were home and had a tree and ornaments, but we were lacking lights and maybe more importantly a tree stand.  We threw the tree in a bucket and walked to CVS.  There we purchased a tree stand and 200 white lights.  Back to the house we went to decorate our tree!!

After a number of tries we finally go the tree straight in the tree stand.  The husband cranked the Christmas music and we spent the next hour or so arranging the ornaments perfectly.  Here’s a close up of a couple of the ornaments.

I am very happy with our final product.  Check it out …

What do you think??  I’m very pleased.  Our menorah and dradle looked great next to the tree throughout Hanukkah! Maybe next year we will buy a tree skirt and actually get some gifts under the tree :)  We did have a present under the tree for less than 24 hours.  Then I couldn’t wait any longer and gave my husband his holiday present prior to Christmas Eve.

Happy Holidays!

Don’t forget to leave your tidbit by commenting :)

Share

Happy Photo Friday!  It has been a few weeks, but I am trying to get back in the swing of posting one of my favorite photos each Friday.  I took this picture while we were honeymooning in Italy.  We were making the hike through the 5 islands of Cinque Terre.  This is a shot of Monterosso.  Oh how I can’t wait to go back to Italy one day!

Have a great weekend!  We will be back Monday with some home improvement blog post.

Share

I’m not really sure how it’s already December.  It feels like it was just July, 90* outside and the holidays weren’t even on my radar.  But it is December, which means Hunukkah right around the corner … just two days to be exact.  It seemed like a good time to revisit the recipe below for the potato latkes.  What’s even crazier about this blog post is it was my very first real post!  So without further a-do here is the Potato Latke Recipe …

———————————————————————————————————————————————————————

Happy Hanukkah (or Chanukah depending on your spelling preference)!!!

This year my friend who usually hosts a Hanukkah party decided to go on a vacation with her sister and mom.  I mean really how dare she go away without providing me with potato latkes before she left. =)  So this meant I would have to make my own potato latkes for the first time ever.

This recipe is super easy and if you have a food processor / Cuisinart it is like a hop skip and a jump to the frying pan.

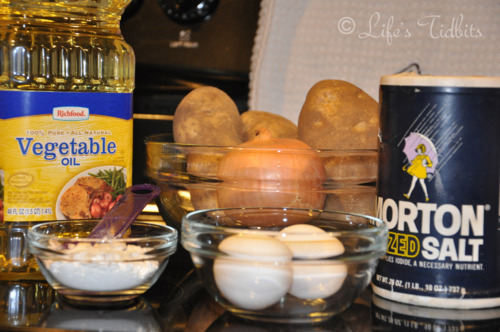
Ingredients:

2lbs (~3 large potatoes)
1 medium onion
2 eggs
1 tsp salt
2 tablespoons flour
vegetable oil

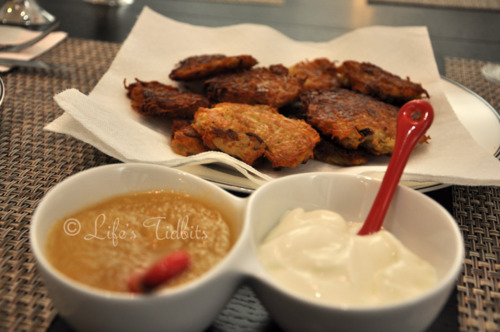
You will also need apple sauce and sour cream to serve with your potato latkes, and I guess if you are my husband then hot sauce should be on the table as well.  Hot sauce is new one for me and I would say skip it, but he insists it tastes good.

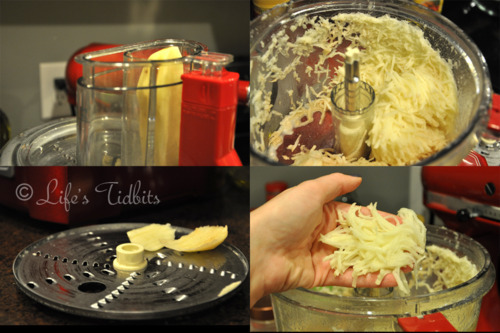
Using a food processor or a box grater shred the potatoes and onions. The food processor saved me a ton of time and makes it so easy!  I got to use one of the attachments for the first time, which is always exciting (it’s the small things, right?!).

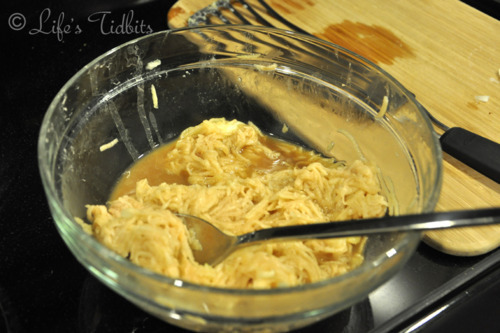
Transfer them to a colander and squeeze dry. Mix the potatoes and onions with the eggs, flour and salt.

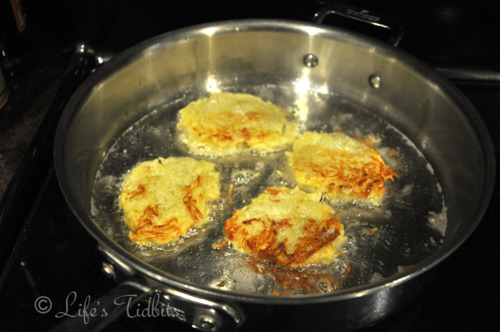
In a skillet, heat 1/4 inch of oil. Drop about four tablespoons for the mixture into the skillet and press lightly to flatten them. Cook over moderately high heat, turning once, until browned and a little crispy. It should be about 6 minutes.

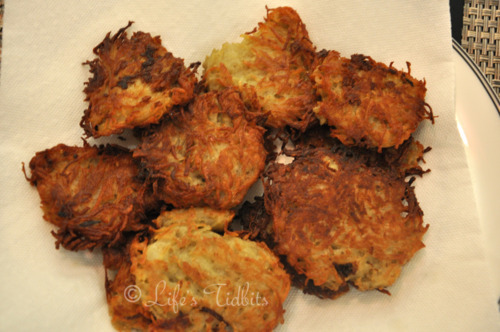
I found that a fish spatula worked really well for flipping these babies and not messing them up.  Just randomly grabbed it, but thought I should pass along the tip nonetheless.  Remove from skillet and place the latkes on paper towels to drain the oil.  It makes about 12 latkes.  And take a look … Voila!

MAKE AHEAD: The potato latkes can be at room temperature for up to 3 hours. Reheat on a baking sheet in a 350° oven before serving. If you plan to reheat them remember that they cook a little extra in the oven so don’t over fry them.

Just writing this blog makes me want to go reheat the extra latkes and eat them!  Anyways put some sour cream (I prefer light as it is less fat but still tastes great) and apple sauce on the table and serve.

And seriously how cute is that double serving bowl?  Thank you wedding guest and Crate and Barrel’s Registry.

Happy cooking!

Don’t forget to leave your tidbit by commenting and/or add Life’s Tidbits to your RSS Reader :)

Share

It seems we have come to the end of the wedding related posts.  I’ve shared my bridal shower and the bachelorette party as well as my wedding dress purchasing experience.  And let’s not forget about it pouring down rain only a few hours before what was suppose to be an outdoor ceremony.  Below I’ve listed all of the DIY projects we tackled along the way as well as the vendors we used.

But before we get to that here are just a few of my favorite pictures from the big day!  All of the photos below were taken by Korie Lynn Photography.

How cool is that detail shot?!?!  The pearl bracelet was HANDMADE by my Aunt!  I couldn’t find what I wanted so she made me the most perfect bracelet I could have ever imagined.

I had always dreamed of getting a picture in front of the white house and this was the perfect shot.  Luckily the rain held off until after this picture was snapped :)

This was taken in the lobby of the St. Regis a little while before the ceremony.  We had time to squeeze in a couple more photos so I suggested the purple couch since it matched our wedding colors.  I love that we are all smiles!

And last but certainly not least the picture above!  There I am between the two most important men in my whole life!  My husband to the left and my Dad to the right.  Not to mention all the special faces I can pick out in the crowd behind us.

Okay so there are some of the top pictures of the evening now for the roundup …

DIY Projects:

  1. Invitations
  2. Envelope Calligraphy
  3. Rehearsal Dinner Invites
  4. Escort Cards
  5. Table #s, Stamps and Thank You Cards
  6. Candy Buffet/Bar
  7. Menu Cards

Vendors:

Ceremony/Reception Venue: St. Regis Hotel
Photographer: Korie Lynn Photography
Floral Designer: MultiFlor
Band: ‘Round Midnight
Videographer: Suburban Video
Hair: George Salon
Makeup: Go Go Gorgeous
Wedding Dress: Stephen Yerick
Bridesmaids Dresses: Lazzaro
Groomsmen: Joseph A Bank

Oh and just in case you missed it we spent our honeymoon in Italy – Positano, Sorrento, Cinque Terre and Rome.

Happy Wedding Planning!!

Don’t forget to leave your tidbit by commenting and/or add Life’s Tidbits to your RSS Reader :)

Share

Centerpieces and/or flower arrangements can be quite costly this time of year.  With Thanksgiving over and Christmas right around the corner it seemed like the perfect time to share the DIY rose and cranberry center pieces we make every Thanksgiving.  My mom got the idea when walking through the flower section in Whole Foods a few years ago.  My mother use to be in charge of making the arrangements, but then my sister took over.  Check out our pretty Thanksgiving table will all the yummy food!!

My sister was kind enough to let me document the process of the center piece creation this year.  So here we go!

What you need:

  • ~27 Yellow Roses
  • 6 bags of whole cranberries
  • 3 square vases
  • water

Place the cranberries in the square vases and add water (but not all the way to the top).

Remove the leaves from the rose stems and hold it up to the vase to determine how much stem to cut off.  Cut off the stem.

Push the rose into the vase between the cranberries.  Then rinse and repeat!!  Each vase will hold about 9 roses depending on the size of the vase.

After you’ve put in all the roses add additional cranberries and water as needed so they are almost to the very top of the vase.  In this end this is what you get.

As you can see we miss counted the yellow roses this year and had to through in a few red ones. I think it still looks pretty cute!

Happy Holidays and DIY!

Don’t forget to leave your tidbit by commenting and/or add Life’s Tidbits to your RSS Reader :)

Related Posts Plugin for WordPress, Blogger...
Share