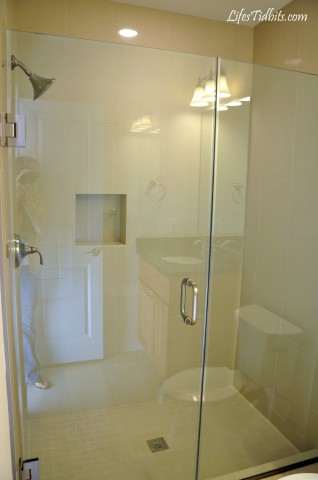
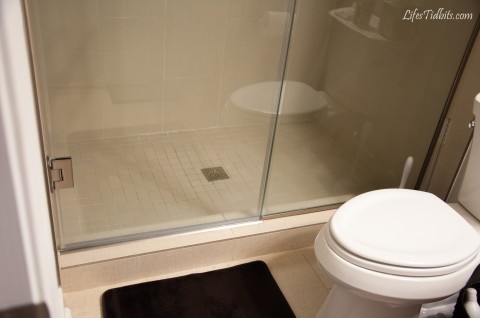
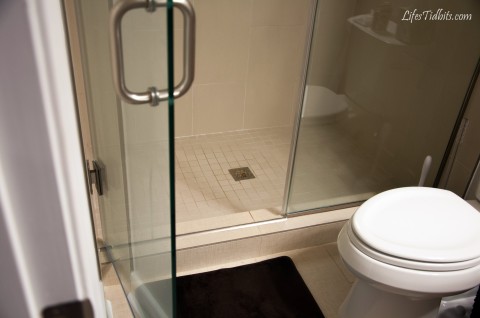
Although I love the glass shower in the master bathroom we noticed very quickly after moving in that it leaks … A LOT.  You couldn’t tell while you were showering, but when you picked up the bathmat there was water underneath.  It was a little annoying, but honestly it was more than that … it was frustrating.  We tried pointing the shower head towards the wall however that didn’t really help.  Plus who wants to shower so they are shielding the water from the door with their body!?!?!

When going through my condo pictures I realized I don’t have one that includes the very bottom of the shower, but you get the idea.  I didn’t realize until I started editing this picture you can see me (and my camera) in the reflection of the glass.

The husband has become quite handy at fixing things around the house, and this little problem we had was no different.  He did some research and determined all we needed was a 1/2 rounded threshold bar.  We (read he) could easily install this fix without having to hire anyone!

This fix required us to purchase a few things.  Here’s what we purchased:

For under $25 we got everything we need and using Amazon Prime it arrived in two days.  It took about an hour to measure, cut, level and seal the bar in the shower door threshold.

The new threshold is doing its job perfect!  No more water leaking out all over the bathroom floor or soaking the bathroom mat!!

Happy Home Improvement!

If you like this post, please leave your tidbit by commenting below!

Share

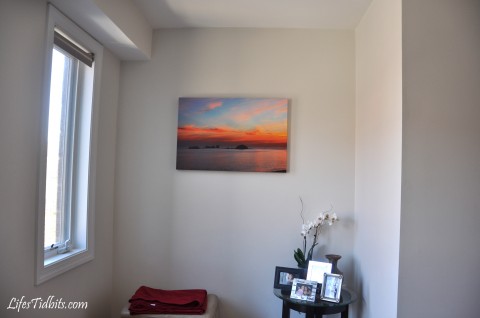
We’ve been doing quite a bit of decorating to the living room and hallway over the last few months.  I’m really excited about all the new little details.  Originally the husband and I had planned on hanging the picture below from Mexico in our master bedroom.  When we ended up going with the red accent wall instead of the gray one the picture no longer would do in the bedroom.  Since we still loved the memories of the trips we’ve taken to Ixtapa and the picture itself I was confident we would find a place for it eventually.

A few weeks ago I threw my friend a baby shower and in an effort to set the house up for the party I moved the big comfy chair from the living room nook to where we placed the Christmas tree this year.  I really liked how the new chair placement no only added one more place to sit near the couch, but also made the living room area feel more cozy!  The only problem was now the nook was pretty much empty.  The side table was still there, but it just wasn’t/isn’t enough to fill the space.  The space needs some wall art as well as piece(s) of furniture.

FINALLY we had found a place for our sunset photo!!  After going back and forth between having the photo as a print and framed or a canvas wrap we eventually decided upon a canvas for the sunset photo.  With some help from the rents I decided upon the size (36 x 24) and ordered it from My Publisher.  The best part was My Publisher was having a sale so we got 40% off the canvas wrap!  Within a week the canvas wrap arrived at our front door.  One hook and a level later we were in business!!

Now all we need is the matching sideboard to our wine rack and dining table.  Once we put the sideboard in this little nook it will be complete.  Please Crate and Barrel send us a coupon so we can get a discount on our sideboard!!!

What do you think of the canvas wrap??

Happy Decorating!!

If you liked this post, please add your tidbit by commenting below!  
Share

Right around the time of Super Storm Sandy the husband and I hung three photos in our hallway.  The other weekend my friend and I took a trip to Michael’s to purchase stuff for my friend’s baby shower I am throwing in February (more on that in the next couple of weeks).  When we were there we did a little extra curricular shopping as well!  It’s hard to go to Michael’s and only buy things that were on the list.  That place has so much fun stuff it’s crazy.

I love the look of “floating” photo frames and with the 40% holiday sale in full swing at Michael’s the justifications of purchasing them was complete!!  I picked out two 5 x 7 and one 11 x 15 frame.  I guessed on what sizes would look nice as add on(s) to the hallways photo gallery.  The husband and I hadn’t even really talked about what other pictures we might add to the wall.  Either way I figured three was a good a number.

For the big frame we picked this 8×10 wedding photo.  I feel slash felt really narcissistic putting up this photo, but I really just love it.  It’s a real smile (not just smiling for the camera in fact I think I was laughing at the husband doing something off to the side) and you can see the whole lobby of the St. Regis hotel.

Source

For the smaller frames we did a 4×6 of our honeymoon in Positano, Italy and a fun picture from the wedding.

I think this picture is probably my husband’s favorite from the wedding.  I had always promised my husband we would find a spot for the picture and a little over a year later I did!  My sister did the details for this after the photographer made the little stick figures.

Source

And can I just say that taking pictures of the hallway is kind of hard … I mean really hard to get a good shot.  I think I need dimmer lights in the hallway to help with lighting for pictures.  Ohhhh husband I have a new project for you hehehehe! =)

I’m not really sure how many more photos we are going to add to the hallway gallery, but I really like the new additions.  This will probably be one of those decorating projects that’s not ever 100% completed.  So we shall say phase 1 and 2 are complete (for now).

Phase 1:

Phase 2:  The extra three pictures make the big wall look a little fuller, which is good.

So what do you think? Do you like the mix and matching of frames?

Happy Decorating!

Share

Centerpieces and/or flower arrangements can be quite costly this time of year.  With Thanksgiving over and Christmas right around the corner it seemed like the perfect time to share the DIY rose and cranberry center pieces we make every Thanksgiving.  My mom got the idea when walking through the flower section in Whole Foods a few years ago.  My mother use to be in charge of making the arrangements, but then my sister took over.  Check out our pretty Thanksgiving table will all the yummy food!!

My sister was kind enough to let me document the process of the center piece creation this year.  So here we go!

What you need:

  • ~27 Yellow Roses
  • 6 bags of whole cranberries
  • 3 square vases
  • water

Place the cranberries in the square vases and add water (but not all the way to the top).

Remove the leaves from the rose stems and hold it up to the vase to determine how much stem to cut off.  Cut off the stem.

Push the rose into the vase between the cranberries.  Then rinse and repeat!!  Each vase will hold about 9 roses depending on the size of the vase.

After you’ve put in all the roses add additional cranberries and water as needed so they are almost to the very top of the vase.  In this end this is what you get.

As you can see we miss counted the yellow roses this year and had to through in a few red ones. I think it still looks pretty cute!

Happy Holidays and DIY!

Don’t forget to leave your tidbit by commenting and/or add Life’s Tidbits to your RSS Reader :)

Share

Before the husband and I first moved in together we decided we wanted three black and white photos for our bedroom.  We narrowed our personal photos down to a picture from the cherry blossom festival, a trip to mexico and one we took while in New York on the Brooklyn bridge.  My friend helped me use PhotoShop to make modify the color pictures to black and white.  I uploaded them to Shutterfly, clicked purchased and we were in business!

These are the pictures we chose …

The husband and I went to a couple of framing stores to get quotes on getting the pictures matted and framed.  We were looking at ~$200+ per picture for custom framing … WAY too much!  The three pictures then spent the next 2 years in a photo album.  From time to time we would revisit the idea of having the pictures framed, but never made any actual progress.  Last week we found a new location for our pictures … the hallway!  I found this post on Young House Love and was inspired.  Although I am not ready to take on the whole wall I do love pictures and have some other items that would work for a wall collage.

In any event we decide these three black and white photos were a good place to start with hallway decorations.  Since Amazon Prime is like my favorite thing I decided to see if there were any nice 8×10 matted frames on Amazon before going to Michael’s or a custom framing store.  I quickly found these picture frames and $17-18 per frame was totally justifiable and the wallet was way more comfortable with it as well!!!

After preparing for Hurricane Sandy Sunday (filling the cars with gas, getting food/water, laundry, dishes, charging every electronic we have and all that good stuff) we took some time out to hang our photos in the hallway.  It took a few tries (three to be exact) but eventually we got the two lower pictures level with each other.

It’s nice to see the hallway starting to come together.  Whether or not we decide to pursue the whole collage look for the hallway is still TBD, but at least there is something on the wall for now :)

Next up is to purchase a runner for the hallway!!

Don’t forget to leave your tidbit by commenting and/or add Life’s Tidbits to your RSS Reader :)

Related Posts Plugin for WordPress, Blogger...
Share