After getting the DIY baby shower invites out the next thing to tackle was the menu and the decorations.  The mom-to-be and I have always joked that she is never lacking black and white outfits.  I figured a black and white color scheme would be perfect and wouldn’t you know it my friend wore a black and white outfit to her shower without even knowing the color scheme!!!  I guess I know my friend pretty well. =)

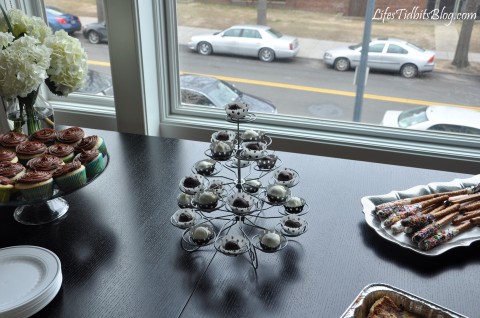
The brunch menu came together quickly.  Although there was definitely too many sweets in the end with a good amount of left over, but who doesn’t like left over Oreo truffles?!?!  I was pretty pleased with the variety of options for the brunch.  Everyone came hungry so there wasn’t a crazy amount of left overs.

Little Man Brunch menu included:

  • Egg Soufflé
  • Pumpkin Bread
  • Fruit Platter
  • Cheese Plate
  • French Toast Casserole
  • Turkey Meatballs in red sauce
  • Oreo Truffles
  • Cigars (aka chocolate covered pretzels)
  • Yellow Cupcakes with Chocolate Buttercream Frosting

We kept the party decorations pretty simple.  A bunch of black and white balloons, two flower vases, onesies and then a few little mustache details to bring everything together.

Unless otherwise noted all pictures were taken by Sara from Photos from the Harty.

Initially I bought some 3-6 month onsies and quickly realized they are SO tiny the iron-ons wouldn’t look so great on them.  I used one 3-6 month onsie for the bow tie (middle) the other two are 12 month onsies.

To supplement the balloons, onsies and mustache details there were two hydrangea flower arrangements.  I feel like I somehow involuntarily collect vases so it was easy to find two that were pretty much the same.  Put some white and black decorative stones in the bottom, add water and the flowers … voila a “DIY” center pieces!

The paper straws and mustache cups were a big hit.  These were probably my favorite detail.  I’ve become slightly obsessed with the paper straws.  There were purple barbershop straws at our wedding and yellow ones for the husband’s 30th birthday party.  The truth is I might never throw another party without them hahaha.  Seriously all parties will have barbershop straws!

We played two shower games.  The first was “How big is mommy’s tummy?”.  I look awfully serious measuring how many toilet paper squares Rebecca’s belly is.  I love the picture to the right as she counts the square … all smiles!!!

Next up was the poppy diaper game.  I was surprised at how stumped everyone was trying to figure out what type of candy bars were in the diapers.  The hardest one was the dark chocolate milky way … apparently the dark chocolate really threw everyone off.  And let me just say that the butterfinger game me a run for my money.  That candy bar was HARD to melt!

Thanks to all the beautiful ladies who came to shower the mom-to-be and her little man!

I put the party favors (with the DIY tags) on a platter and placed them by the front door.  I had to remind people to take them as I didn’t want 14 lollipops for myself!  I think they were a big hit and displaying them during the party added to the decorations.

A big thank you to Sara from Photos from the Harty for taking pictures at party!!

Thanks for combing on over for this Little Man baby shower.  What’s your favorite detail?

Happy Party Planning!

If you like this post, please add your tidbit by commenting below and/or add Life’s Tidbits to your RSS Reader :)

Share

With chocolate mustaches as the baby shower favor completed all I needed was to make the favor tags.  I ordered card stock to print the tags on and started designing them in PhotoShop.  I wanted the design of the tags to be similar to the custom invitations I made so the “paper products” would mesh.

Here’s the final product:

After cutting all the tags down to size using my favorite paper cutter I compiled everything I needed on the kitchen table.

With scissors I cut a small slit in the upper left corner of the tags and threaded the ribbon through.  The the husband got to play assistant and hold the favor bags as I tied the ribbon/tag on each mustache lollipop.

Here’s the final product!

The husband and I thought it would be fun to try out one of the extra mustaches on Sophi.  She was desperately trying to lick the chocolate while we photographed her.  Doesn’t she just look adorbs with her ‘stache?!?!

What do you think of the DIY party favor tags?  Stay tuned … more Little Man baby shower details coming up soon!

Happy Party Planning!!

If you enjoyed this post, please add your tidbit by commenting below.  Please follow Life’s Tidbits on Facebook and/or Twitter.

Share

A while back I found this blog post about chocolate mustaches.  I had been wanting to make them for a while.  After purchasing the chocolate molds on Amazon along with the lollipop sticks they sat in my cuboid waiting to be used.  I considered making some for a friend’s bachelorette weekend, but ending up making a cake instead.

Then one of my besties got pregnant AND she found out she was having a BOY!!! Finally, I offered to through her a baby shower and after a bit of research decided to do a “little man” themed shower.  Check out the DIY invitations for the baby shower.  FINALLY these mustache molds were going to come in handy!

I considered making the mustache chocolates as cupcake toppers, but decided they would be perfection as a thank you gift for the guests.  I bought the chocolate molds and lollipop sticks on Amazon.com, however I also found molds at Michael’s made by Wilton.

Here are the directions on how to create these adorable lollipops.

What you need:

Melt your chocolate as usual.  I melted the chocolate with my new Wilton Chocolate Pro that my parents-in-law got me this holiday season.  It works great and is a lot easier than trying to melt the chocolate in the microwave!  Anyways, about 1/4 LB of chocolate, makes 4 pops.

Fill the mold with chocolate using a teaspoon. Make sure it’s filed to the top, but don’t overfill the mold.  The chocolate should reach the outer corners. If you have any overflow or extra, wipe it clean.

Tap the mold gently on the counter to release air bubbles.  Push the sticks into the mold and carefully roll them until they are covered in chocolate.  Tap the mold gently on the counter again to smooth the surface.

Put mold in the freezer for about 10 minutes or until the chocolate releases from the mold when turned over.  If if the lollipops don’t come out easily put them back int he freezer for a few more minutes.

I ended up with 1/2 white chocolate and 1/2 milk chocolate.  I hope people like both types of chocolate or I am going to have A LOT of left over mustaches. :)  I’m pretty please with the final product!!

Happy Party Planning!

If you like this post, please add your tidbit below by commenting and/or add Life’s Tidbits to your RSS Reader :)

Share

My friend Kia threw her son a first birthday party a few weeks back.  The party was decked out with all sorts of details and DIY projects.  As co-owner of Baker’s Bliss she also made all her own cupcakes for the party!  Party details as told by Kia…

For my son’s 1st Birthday I wanted to do something different and something fun.  Hopefully, along the lines of cost effective as well.  I looked through a variety of themes of things to do and most of them felt too kiddy.  As every parent knows the first birthday party is more for the adults than the kids and so I wanted a fun theme that all ages could enjoy.   I searched the internet high and low and ultimately fell in love with the posts I had seen from different moms who had decided on the “one year in a flash” theme.

I didn’t have a lot of time to put the party together being a full time mom of 2 plus my full time job left me with not that much time to put the grandiose party on that I wanted too.  However, my bestie and business partner Rebecca was in town to save the day.   And so began the party planning….

First, I made a list of what I wanted to do.  It was hard to come up with this list because I really wanted to do all the ideas I had seen on the internet.  They ranged from photo booths and custom chalkboards to custom banners and cupcake stands.  All of which I thought was ridiculously creative and cute, but I had to be realistic.  I really had about 3 days and unlike most of the other party planners I had intended on making my own cupcakes because that’s just what I do!  So these are the things I decided I was going to do for the party.

Decorations:

  • Custom Banner (What better way to say you are 1 then a year of pictures to remind you)
  • Custom Cupcake Toppers
  • High Chair Banner
  • Balloon Display
  • Photo Booth
  • Custom Thank you Cards
  • Custom Water Bottles

Food:

  • Dessert Table complete with custom chocolate covered Oreos in the theme colors and “camera” sugar cookies.
  • Chocolate Cupcakes with Vanilla Bean Buttercream
  • Vanilla Bean cupcakes with Vanilla Bean Buttercream
  • Pigs in a blanket for the kids
  • Veggie Tray
  • Fried Chicken
  • Queso Dip
  • Chips

This all seemed pretty overwhelming so I ended up ditching the Photo Booth.  I simply just didn’t have the time or the energy given the list of other things that had to get accomplished.

For the Banner, Thank You Cards and Cake Toppers I needed photos!  It was already Wednesday and the party was Saturday so I had to come up with the photo digging through all my digital memorabilia over the last year and get them printed and ready really by Thursday.  CVS photo online to the rescue!  I uploaded the pictures and picked them up at the CVS down the street from me the next morning and it was only .19 cents a picture!   This really came out very cost effective since in addition to the 12 pictures I needed 24 cupcake toppers and 20 thank you cards.

Here’s how the banner came out:


Here are the Thank You Cards:

And the Cupcake Toppers:

Here’s how the dessert table turned out:

You can see my nice balloon display courtesy of Party City.

Admittedly, most of the food items I purchased them from the local super market.  The Fried Chicken was purchased the hubby and then he made the veggie tray and queso dip.  I made the pigs in a blanket and here is what the food table looked like.  The table display was done by my friend Monique!

The chocolate covered Oreos were a big hit and proudly displayed on the right and the custom water bottles on the left.  After all the work it all turned out great.  We all had an amazing time.  I hope you enjoy the pictures and the ideas.  It was a great party!

Check out the Baker’s Bliss website or like them on Facebook.  Thank you Kia for stopping by and sharing your party tidbits with us!!

Happy Party Planning!

Related Posts Plugin for WordPress, Blogger...
Share