After painting the guest bath, master bedroom and the living/dining room the only thing left to paint was the master bathroom.  We had agreed to leave the builder grade paint in the guest room until we decide exactly what we plan to do with that room.  The guest room is pretty much a landing zone or storage room at the minutes, which clearly isn’t ideal.  Anyways, similar to the living/dining room choosing a color for the master bath wasn’t easy.  We ending up going with a color that’s a shade darker than our living/dining room after putting couple different samples on the wall.

Once we were pretty sure we wanted the color we put a big color swatch on the wall.  Do you see my reflection in the shower?  Hahaha I was attempting to document the process.

After painting the guest bath we knew that the correct paint to buy was semi-gloss.  We “assumed” the guest and master bath were approximately the same size we purchase 1 quart of paint.  We were well, WRONG!  The master bath is slightly bigger so we really needed two quarts of paint.  Back to the store I went to pick up the extra quart.  Then something disastrous happened.  We started painting the remaining wall and somehow the color just was NOT the same. I really don’t know what happened … the husband and I stood there looking at the wall and then at each other and we were seriously PERPLEXED.  In any event it was unanimous that we needed another quart of this paint in an effort to resolve the issue.

Back to Sherwin Williams we went to purchase our THIRD quart of this paint.  We were so excited to get home and make that final wall match all the rest that we  pulled out all the painting supplies and got to work.  Clearly this damn bathroom just didn’t want to be painted … I’m not sure how it happened by the roller started shedding and the wall started to look all textured.  At this point we were so perplexed I didn’t even think to break out the camera to document the disaster that was unfolding.  We attempted to wipe the wall down with paper towels and start over, but that was an epic fail leading to an empty paint can and a textured wall.

After letting the wall dry and sanding it back to “normal town” we were ready to being painting the dreaded wall again.  SOOOOO back to the paint store we went for a fourth and final time.  The husband goes in to buy the paint and when he got back to the car he looked a little defeated …

Me – “What’s wrong?”

Husband – “The just asked me if I was aware of how many quarts of the same colored paint we’ve purchased.”

Me – “Too many … but it wasn’t our fault there were so many issues.  Didn’t you tell him all the issues we had.”

Husband – “Nope.  Just told him I was aware we should have purchased a gallon at the start of this project.”

Me – “Oh okay then.”

My poor husband was so horrified that we had to purchase so many quarts that he wouldn’t own up to the issues we encountered when the sales man pointed out we purchased incorrectly. :)

After the fourth quart of paint we were FINALLY able to fix the remaining wall and put a little extra paint on the other walls. Unfortunately I haven’t master the process of having paint colors show up correctly in pictures when there is zero natural light.  Therefore there is no great “after shot”.   Sorry :(.   It was SO nice to call that project a wrap after four tries LOL.  Overall I love the color of the bathroom.  Now I am on the hunt for a new bathroom mat and accessories.  Somehow the to-do list never seems to dwindle!

Happy home improvements!

Don’t forget to leave your tidbit by commenting and/or add Life’s Tidbits to your RSS Reader :)

Share

Our condo has a little balcony off the master bedroom.  After moving in we put some old chairs on the balcony and sat out there every once in a great while.  Lacking something comfortable to sit on didn’t make the space too inviting.  When my parents and sister came to visit and see the condo for the first time my mom and I made a list of the stuff we still needed to purchase.  The balcony furniture made it to the top of the list pretty quickly.

That afternoon the husband and my dad did “guy things”.  Like going to Home Depot, installing a dimmer switch in the living room and I believe there was some sitting on the couch with beers in playing on the laptop/ipad (but I could be wrong…wink wink).  Meanwhile my sister, mom and I headed out to do some shopping.  We had no luck after going to World Market and Home Goods.  Despite feeling a little defeated we headed over to Pier 1 Imports to see if they had anything.  We walked in and almost immediately we fell in love with plicker (plastic wicker) red chairs.  They were comfortable and complimented the accent red tamale wall in the master bedroom.  My mom roamed around the store and spotted nested tables that she thought would work well on the balcony.

My mom obviously knows my style well. I really liked the nested tables.  I took pictures of the chairs and tables with my Driod and sent them to the husband for approval.  He was quick to respond with a yes on both, so we were in business!!  To make sure we loved the new items I had my mom and sister sit down and pretend like they were having drinks.

After playing tetrus with the car and new furniture we FINALLY were able to get everything in and headed home.  I really thought we might have to return everything and go back and buy it when we had a bigger car!

The balcony is so inviting now that it’s had a furniture face lift.  I love our little balcony and it’s perfect for morning lattes, afternoon drinks, reading and relaxing.  Sophi likes the balcony too … can you see her sneaking into the picture?

Heck the balcony is even great for an intimate dinner and since the weather in DC is not longer 90 plus degrees each night we even had dinner on the balcony the other evening.

Had to squeeze that last Instagram picture into the post :)

Happy Outdoor Living!

Don’t forget to leave your tidbit by commenting and/or add Life’s Tidbits to your RSS Reader :)

Share

I find it odd that I’m perfectly capable of caring for a dog, but give me a plant and the thing is dead in less than a week.  I mean it’s a serious black thumb problem I have.  We offered to water our neighbor’s plants while they were on vacation and I made the husband do it since I was afraid I would instantly kill them all.  Despite my inability to keep plants alive I’ve always wanted to have a little herb garden.  The thing is when I got into cooking recipes would call for fresh herbs.  So I would buy a package of mint, for example, and then only use two tablespoons.  The rest would sit in the refrigerator and go bad in no time.  Those little packages cost like $2 and you can buy a pre-planted herb for $2.99.  The way I see it is my black thumb is not only killing the plants, but my wallet too … hahahaha!

So this weekend the husband and I went herb shopping.  My big thing was I didn’t want to start from seedlings.  Apparently Home Depot doesn’t carry herb plants, only seeds.  I just assumed Home Depot would have them, so when they didn’t we had to go a different route.  We found basil at the grocery store and then chives, mint and parsley at a flower shop.  If I’m able to keep these four herbs alive I plan to add rosemary and thyme to my little “garden”.

We laid down some plastic so the potting soil didn’t get all over the hard woods and started planting the herbs.

When I was done planting the husband and I talked about where we should put our herb plants.  We have this little “balcony” off of our living room, which I’ve never really known what to do with.  A while back I stuck an odd chair out there.  I wouldn’t say it is an eye sour, but not exactly elegant either.  If I am able to keep these herbs alive I think it will be time to say goodbye to the old chair and hello to our herb garden.

But for now a little cohabitation will be going on. I don’t think the chair will mind sharing the space. :)

After only one night my basil is already wilting. I’m praying it perks back up.  This is not exactly the start I was hoping for.

People, please cross your fingers and channel some of your green thumb vibes my way!! I really hope these little guys make it.  Any tips for me on how to keep these little guys alive?

Don’t forget to leave your tidbit by commenting and/or add Life’s Tidbits to your RSS Reader :)

Share

While doing “married things” {phrase coined by the husband} we ended up at The Container Store.  Clearly this is one of those places like Target or Bed Bath and Beyond, where I find things I never knew I needed but while we are there I think I really do NEED them.  I mean there is no reason we should have spent 1+ hours at The Container Store when it was sunny and 80 plus degrees outside.  But anyways, while walking up and down each aisle we ended up with quite the large cart of stuff we “needed”.

One of the many items in our cart was elfa kitchen storage.  Our condo is the first place I’ve lived where I haven’t had to use cabinets to store food.  The pantry is great and has really come in handy for storing items not eatable as well like batteries, lunch boxes, cook books and dish towels.  As a result our pantry has been pretty much over full since moving in.  We were hoping the elfa storage would expand the pantry a little bit.

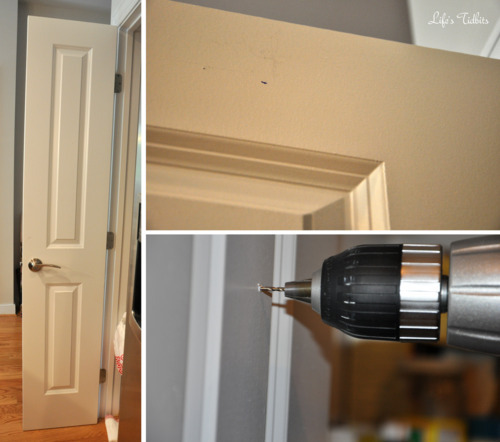
Installation was very easy.  Hold the long rod up to the back of the door and mark the places where the screws go.  We went ahead and drilled the holes a little to get it started and make the screw go in easier.

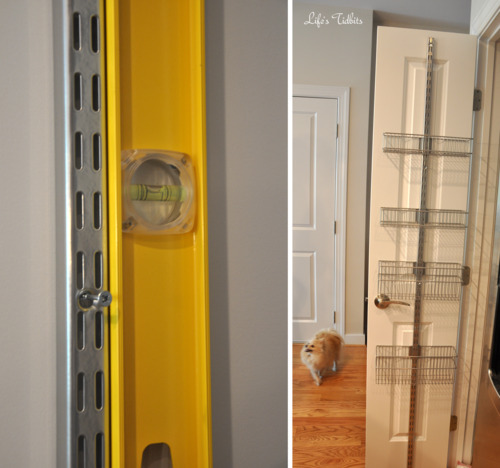
We held up the rod and put two screws into the door to hold the rod in place.  Before fulling anchoring it to the door we ensured it was level.  It was so we put all the screws securely into the door, clipped on the baskets and we were done.  The great part about the baskets are they come in standard and narrow.  We purchased the narrow baskets to ensure they wouldn’t hit the shelving in the pantry.

Initially we purchased 4 baskets.  We were pleased to see there was plenty of room for 2-3 more baskets.  Back to the container store we went and purchased two additional baskets.  We are loving the new storage and the way the baskets help with organization!!

What do you think of our new expanded pantry?

Happy home improvements!

Don’t forget to leave your tidbit by commenting and/or add Life’s Tidbits to your RSS Reader :)

Share

Long before we moved into our new place, let alone closed on the condo, my husband was furiously searching for a wall mount for the tv.  He had a number of requires, but at the top of the list the mount had an arm that would allow the tv to swing out.  This would enable us to watch tv while cooking in the kitchen.  Thank goodness for our open floor plan or the swing out arm would have been a moot point.

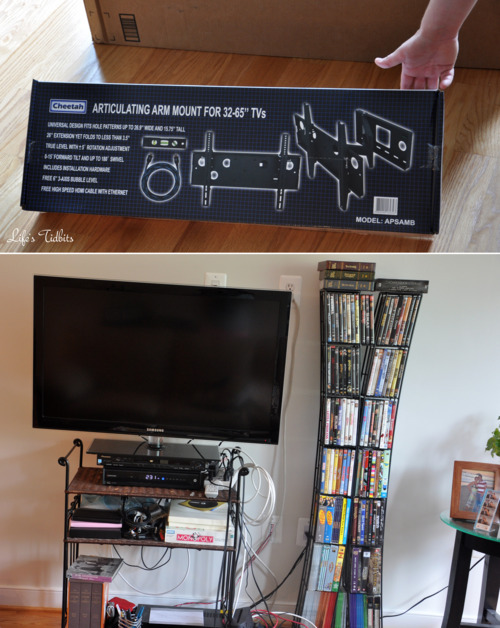
Being the sweet man that my husband is, I was consulted numerous times on which mount I liked the best.  I really didn’t care and told him to choose and purchase whatever he thought was best.  After much search and deliberation he decided on a Cheetah Wall Mount.  Two days later the mount arrived … yay for Amazon Prime’s two day shipping.

Above is our before picture.  The tv stand was purchased from Pier 1 Imports and the dvd rack from Best Buy back when I was in college. I would say they’ve both seen better days and it is about time we replace them.  Installing the tv wall mount was the perfect first step.

First step was to find two studs.  Luckily we are in possession of a stud finder.  We marked where the center of the studs were and then we measured and drill four holes for the screws.  The wall mount is A LOT heavier than we imagined it would be.  The husband held up the wall mount while I screwed in the washer with the screw.

Then we went ahead and screwed the arms onto the back of the tv and hung it. The cool part about the wall mount is it has a built in level “bubble”.

After a few tweaks it was leveled and hanging on the wall!  We also took the plunge and invested in a new tv stand to use with our new fancy wall mounted tv.  The living room is finally coming together … so exciting!

To celebrate our newly mounted tv we cooked dinner and rented a movie on demand. :)

Happy home improvements!

Don’t forget to leave your tidbit by commenting and/or add Life’s Tidbits to your RSS Reader :)

Related Posts Plugin for WordPress, Blogger...
Share