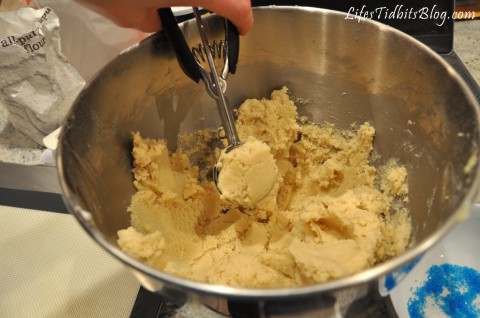
It’s Tuesday, which means it’s time to share another Tasty Tuesday recipe!  Ever since I ate a sugar cookie at Potbelly’s I’ve been on the look out for a killer homemade sugar cookie recipe.  Have you ever had a Potbelly sugar cookie?  They are A-MAZING! You should seriously try one.  It is a little crunchy on the outside and complete heaven in the middle.  Yes, I know, I am completely obsessed.

During my quest to replicate this recipe I found a post on HWTM blog that resulted in a pretty good cookie.  In all honesty though it didn’t rival the Potbelly cookie, so the search continued.  Last week a friend shared a recipe from Savory Sweet Life with me.  With rave reviews I hoped these sugar cookies would meet my expectations … and boy did they ever!  Yummolious!

Not only is my quest for an amazing homemade sugar cookie over, but I can also check off cooking one new recipe each month from my new years resolution list, for the month of January!

One thing to note about this recipe is finding the sugar crystals in the grocery store is tough. Neither Safeway nor Harris Teeter carry the sugar crystals, so planning ahead is important.  I was able to locate sugar crystals at Michael’s and Amazon.com.  Since the sugar crystals wouldn’t be delivered until Friday and I needed the cookies for girls night on Thursday I went ahead used left over blue sugar sprinkles.

Ingredients

  • white sugar
  • salted butter
  • egg yolks
  • vanilla extract
  • all-purpose flour
  • baking soda
  • cream of tartar
  • salt
  • coarse sugar crystals  {can substitute regular granulated sugar}

Get full recipe here

Directions:

Preheat oven to 350 degrees F.

Cream the butter and sugar together until it is nice and creamy.  Mix in 1 egg yolk at a time and then the vanilla extract.

In a bowl mix together the flour, baking soda, cream of tarter, and salt.  Slowly add to the mixer until the cookie dough is completely mixed.  Scrape down the bowl to be sure everything is mixed.  Using a medium scoop, form dough balls.

Roll the cookie ball in sugar crystals and place on a cookie sheet lined with parchment paper about 2 inches apart from one another.  Or you can use a baking mat if you don’t have parchment paper.  I suggest flattening them out just a little so the center doesn’t get too puffy (the original recipe said not to flatten them).

This recipe makes about 30 medium sized cookies.  Bake for 12-14 minutes.  Make sure not to over cook them.  They will harden as the cool.  I made the mistake with one batch of leaving them in too long cause they didn’t look golden brown to me.  Remove from oven and allow cookies to remain on the cookie sheet for 5 minutes before transferring to a cooling rack.

Enjoy and Happy Cooking!

If you enjoyed this post, please leave your tidbit by commenting below!  You can also follow Life’s Tidbits on Twitter.

Share

A while back I found this blog post about chocolate mustaches.  I had been wanting to make them for a while.  After purchasing the chocolate molds on Amazon along with the lollipop sticks they sat in my cuboid waiting to be used.  I considered making some for a friend’s bachelorette weekend, but ending up making a cake instead.

Then one of my besties got pregnant AND she found out she was having a BOY!!! Finally, I offered to through her a baby shower and after a bit of research decided to do a “little man” themed shower.  Check out the DIY invitations for the baby shower.  FINALLY these mustache molds were going to come in handy!

I considered making the mustache chocolates as cupcake toppers, but decided they would be perfection as a thank you gift for the guests.  I bought the chocolate molds and lollipop sticks on Amazon.com, however I also found molds at Michael’s made by Wilton.

Here are the directions on how to create these adorable lollipops.

What you need:

Melt your chocolate as usual.  I melted the chocolate with my new Wilton Chocolate Pro that my parents-in-law got me this holiday season.  It works great and is a lot easier than trying to melt the chocolate in the microwave!  Anyways, about 1/4 LB of chocolate, makes 4 pops.

Fill the mold with chocolate using a teaspoon. Make sure it’s filed to the top, but don’t overfill the mold.  The chocolate should reach the outer corners. If you have any overflow or extra, wipe it clean.

Tap the mold gently on the counter to release air bubbles.  Push the sticks into the mold and carefully roll them until they are covered in chocolate.  Tap the mold gently on the counter again to smooth the surface.

Put mold in the freezer for about 10 minutes or until the chocolate releases from the mold when turned over.  If if the lollipops don’t come out easily put them back int he freezer for a few more minutes.

I ended up with 1/2 white chocolate and 1/2 milk chocolate.  I hope people like both types of chocolate or I am going to have A LOT of left over mustaches. :)  I’m pretty please with the final product!!

Happy Party Planning!

If you like this post, please add your tidbit below by commenting and/or add Life’s Tidbits to your RSS Reader :)

Share

I have become a big fan of citrus, specifically lemon, in my desserts as of late.  Maybe it started when we were on our honeymoon in Italy … the lemon gelto, limoncello and other lemon stuff was to die for.  Around the holiday season I found this recipe on How Sweet It Is and immediately put in on my must make list. White chocolate plus lemon = YUM!

Even the husband who isn’t a huge fan of chocolate in general, thought the lemon truffles came out great and is looking forward to me making them again.  Just a thought, but if you are making a fancy dinner for Valentine’s Day and looking for a special dessert, I do believe your search is over!!!

Ingredients:

10 ounces white chocolate, chopped
2 tablespoons unsalted butter
6 tablespoons heavy cream
1 teaspoon corn syrup
2 drops lemon extract
the zest of 1/2 a lemon
1 tsp fresh lemon juice
white sanding sugar for coating

Recipe slightly changed from How Sweet it Is to include more lemon!

Directions:

Place the white chocolate and butter to a bowl, then microwave on medium power for 30 seconds. Stir a few times, then microwave for 20 more seconds.

Add heavy cream and corn syrup to a small saucepan and heat over medium heat just until bubbles appear on the edges.  Immediately pour the cream over the melted chocolate and butter, stir for a few minutes until combined.  Add in the lemon extract and lemon zest, mixing to combine. Place in the fridge for 2 hours.

Remove from fridge and scoop out teaspoon-size balls of chocolate with a melon scoop or teaspoon and roll into balls.  You should have enough for about 30 truffles.

Then roll them in the sanding sugar and coat completely. Put them back in the refrigerator for about 30 minutes.  They will get a little bit soft when you create the balls so putting them back in the refrigerator helps.  Then serve and enjoy!

These little truffles are SUPER decedent and D-E-LISIOUS.

Happy Cooking!!

If you like this post, please add your tidbit by commenting below!  You can also follow Life’s Tidbits on Facebook and/or Twitter.

Share

I have a little bit of an obsession with Food Network.  If there isn’t a show recorded on DVR that I want to watch, Food Network is my next go-to channel, followed by HGTV.  Food and home improvement … you can clearly see where my passions lie.  One day while blogging and watching Barefoot Contessa, Ina Garten was cooking her “Perfect Roast Chicken“.  I quickly made a mental note that I must make this dish.  An opportunity quickly presented itself and I adapted the recipe just a little.  This dish is well … absolutely DELISH!!!

Not only is this recipe super yummy, but totally falls within the healthy cooking/eating category.  WIN WIN!!!  And just to add one more log to this amazing fire (yeah I’m horrible with analogies, but I try!) it is also a pretty cheap dinner menu item that will impress!!  So I hope you enjoy the Tasty Tuesday recipe this week.

Ingredients:

1 (5 to 6 pound) roasting chicken
Kosher salt
Freshly ground black pepper
1 large bunch fresh thyme (and/or rosemary)
1 lemon, quartered
1 head garlic, cut in half crosswise
2 tablespoons (1/4 stick) butter, melted (can be substituted with olive oil)
2 large yellow onions, thickly sliced
4 carrots cut into 2-inch chunks
4 Yukon Gold Potatoes cut into quarters

When you get the chicken home remove the chicken giblets and pat the outside dry, salt it inside and out, wrap it and keep it in the refrigerator for up to 2 days.

Preheat the over to 425*.  Place the onions, carrots, potatoes and some thyme in a roasting pan.

Pat the chicken dry and liberally salt and pepper the inside of the chicken. Stuff the cavity with the bunch of thyme, lemon, and all the garlic.

Brush the outside of the chicken with the butter and sprinkle again with salt and pepper.

Tie the legs together with kitchen string.  Place the chicken on top and tuck the wing tips under the body of the chicken.

Roast the chicken for 1 1/2 hours, or until the juices run clear when you cut between a leg and thigh. Remove the chicken cover with aluminum foil for about 15 minutes.  I suggest putting this in a bowl, because the juices will seep out of the chicken as it rests.  I did this on a cutting board the first time and literally juice all over the floor and my dog, Sophi, was seriously pleased about this!!!

Allow the vegetable to continue cooking.  Slice the chicken and place it on a platter with the vegetables.  I like to pour some of the juices over the chicken/veggies.  The rest of the juice/gravy put in a gravy boat … I promise your guests will appreciate it!  This serves about 4 people.

Happy Cooking!

Share

Happy New Year!  Can you believe it’s 2013?!?!  Last night we hosted a New Years Eve pot luck dinner with some friends.  It was a great way to welcome 2013.

I’ve never been one for making new years resolutions mainly because I can’t seem to keep them.  Instead I used to keep a list of things to do or places to go, never really managing to stick to that list either.  Every once in a while I succeed a keeping a new years resolution, like passing the PMP exam last year, but 9 times out of 10 I’m an utter failure.  Despite my affinity for skipping the new year list of resolutions  I decided to give it one last try this year.  Maybe with the list out there in the world wide web I will feel more accountable and actually follow through.

I don’t want to bite off more than I can chew so hopefully this list isn’t too lofty a list.

1 – Improve Photo Skills and Take More Photos

My husband bought me a fancy camera a few years back.  I’ve slowly learned how to use the different features on the camera as well as improved the quality of the photos taken.  The Pioneer woman taught me a lot about apertures and shutter speeds here, here and here. A few photography books have been sitting on the book shelf waiting for proper attention to be paid to them.  In order to become a better photographer one must take pictures, so taking more photos goes perfectly as a sub-resolution.  Photography is something that has been on my “to-do” list for quite some time.  I love it and yet don’t make time for it.

Source

2 – Get in Better Shape

I put this goal on and then took it off, but inevitably it really should be on the 2013 list.  I find many people have a similar new years resolution, which is why gyms become PACKED from January to late February.  Purposely weight is not something in the title of the resolution.  Weight is touchy and regardless of how much I do or don’t weigh I should be in better shape.  If I loose weight while getting in shape, fantastic, but it isn’t the overarching goal.  I was in great shape for our wedding.  I spent a lot of time eating well (thank you weight watchers) and taking long walks with one of my friends.  She too was working out to prep for her wedding.  Although walking is good for the body it didn’t seem like we were working out.  We would chat and laugh and walk … before I knew it the “workout” was over.  So whether it’s walking, yoga, running or weight lifting in some way shape or form the end result will hopefully be an in shape girl (errr woman) in 2013.

Source

3 – Stay in touch with Friend and Family

Despite being in love with talking on the phone as a child I don’t really enjoy it as an adult.  Phones were the theme for my Bat-Mitzvah, that’s how much I adored talking on the phone.  I don’t know when or how the change in behavior occurred, but it is reeking havoc on some much needed catch up conversations with family and friends.  I have a couple of friends who I miss terribly.  They are the type of friends that no matter how much time has passed you pick up right where you left off.  I am fortunate to have that type of relationship with them!!  Despite that, it feels like I am missing out on big chunks of their lives (and them on mine).  I know I should really just pick up the darn phone and call them.  So this year I am going to try to be better.  Less email/gchatting and more calls or trips to see my friends and family!

Source

4 – Try one new Recipe a Month

This one should be pretty easy.  Cooking is one of my favorite hobbies.  I think it’s almost therapeutic at times, so making one new recipe a month shouldn’t be too tough.  My husband’s parents got me a subscription to Fine Cooking this holiday season, which should come in particularly handy for this new years resolution.  Hopefully the new recipes will include appetizers, sides, main dishes as well as desserts.   I’m not going to put any parameters around what type of recipe needs to be cooked though … regardless of the type of dish one new one will, hopefully, be cooked each month.

5 – Be a Lady (as my sister-in-law says hehehe)

So what does being a lady entail you might ask.  Well simply is means taking better care of yourself as a woman.  Over Christmas my sister-in-law and I discussed this list to include: doing our nails, putting on (and learning how to do) makeup as well as learning how to style hair.  The nail polish part I’ve pretty much got down.  The makeup I would say I’m 50% there. I wear makeup to work and I’ve been getting closer and closer to mastering the whole smokey eye look, but there is still lots to learn.  Hair styling could be an epic fail for me.  Having long hair as a child and adult, one would logically think I would know what to do with it … however … that would be a NO.  I can french braid other people’s hair and am a master at the ponytail.  Curls, buns or any other cute hair styling ability is lost on me.  Regardless I will give it a try and maybe share some of the hair styling tidbits along the way.  In an effort to gather ideas for being a lady there’s a special Pinterest board dedicated to this resolution.

So there you have it.  Bring it on 2013!!!  I really hope I am not taking on too much for my first official list of new years resolutions!

What’s your new years resolution?  Happy 2013!

Related Posts Plugin for WordPress, Blogger...
Share