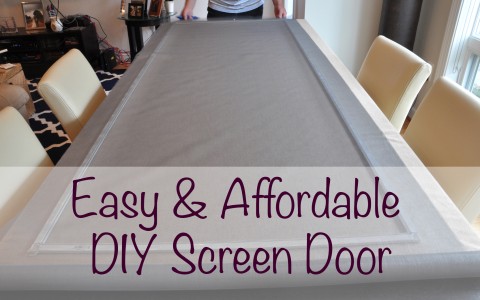
You’ve probably heard of the honey-do list, but when my father comes to visit it’s more of a Daddy-do list.  Ever since I moved into an apartment in college I’ve always had a list of things for him to fix or do while he’s visiting me.  There was one time my parents came to visit and my dad walk in the door, looked at me and said “so what do you want me to do this time?”.  I couldn’t help but chuckle a little.   Although he might sometimes pretend to be annoyed by my wanting him to do stuff around my house or fix my computer I think deep down he loves it.

So when he arrived a few weekends ago for a visit I already had my daddy-do list planned out.  The last time he visited us in the condo he installed a dimmer switch in the living room.  The best part of the dimmer switch in the living room is we can make “movie theater” lighting when watching tv. I love it. I mean who doesn’t like lights that dim?!?!

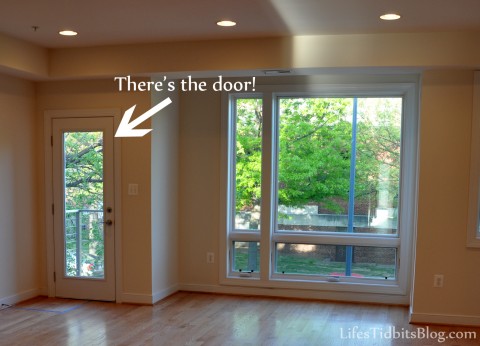
Anyways, I wanted him to install a couple of additional dimmer switches in the condo, but the big project I had in mind was building us a screen door.  As I had mentioned in my herb garden post we have this little “smokers balcony” off our living room.  Since the weather in DC is finally getting cool it’s nice to open the window and the fresh air in.  That’s front door offers a lot of air, but doesn’t keep the bugs out.  Seriously my legs and hands were eaten alive by the mosquitoes that got in our house.  So you know what that means … clearly we need a cheap/DIY screen door.

Home improvement DIY Screen Door | Life's Tidbits

That picture was taken prior to moving in.  I promise we now have furniture in the living/dining room.  My dad was up to the challenge and here’s how we (read my dad) made the screen door.

What you need:

First he measured the door frame and then cut the aluminum screen frame down to size.  We purchased 4 pieces of frame.  We probably should have bought an extra just in case because somehow we cut the frame a little too small.  Luckily my dad is a master problem solver and with a little cooking twine we were able to add in the extra amount of space we need.

After my dad figuring out how to fix our little measuring problem we laid the screen out over the door frame.  Make sure to give yourself a little extra screen around the edges.  You don’t want it too tight or the screen door will bend inwards.

Take the screen spline and roller and attach the screen to the frame.

Then we cut off the extra screen along the edges.  We realized there was nothing to hold onto when pulling the screen door into place.  Sooooo Daddy to the rescue as always.  We put screws in to use as handles.  At some point I plan to go ahead and buy one more piece of aluminum frame and attach that so the handle is a little easier to grab.  For now the screws are working out just fine!

So there you have it. A pretty easy, cheap and quick DIY screen door.

Best part is you can barely tell there’s a screen door in there unless you get close up to it.  Here’s your close up:

Happy home improvements and a little DIY!

Don’t forget to leave your tidbit by commenting below!

Share

Our condo has a little balcony off the master bedroom.  After moving in we put some old chairs on the balcony and sat out there every once in a great while.  Lacking something comfortable to sit on didn’t make the space too inviting.  When my parents and sister came to visit and see the condo for the first time my mom and I made a list of the stuff we still needed to purchase.  The balcony furniture made it to the top of the list pretty quickly.

That afternoon the husband and my dad did “guy things”.  Like going to Home Depot, installing a dimmer switch in the living room and I believe there was some sitting on the couch with beers in playing on the laptop/ipad (but I could be wrong…wink wink).  Meanwhile my sister, mom and I headed out to do some shopping.  We had no luck after going to World Market and Home Goods.  Despite feeling a little defeated we headed over to Pier 1 Imports to see if they had anything.  We walked in and almost immediately we fell in love with plicker (plastic wicker) red chairs.  They were comfortable and complimented the accent red tamale wall in the master bedroom.  My mom roamed around the store and spotted nested tables that she thought would work well on the balcony.

My mom obviously knows my style well. I really liked the nested tables.  I took pictures of the chairs and tables with my Driod and sent them to the husband for approval.  He was quick to respond with a yes on both, so we were in business!!  To make sure we loved the new items I had my mom and sister sit down and pretend like they were having drinks.

After playing tetrus with the car and new furniture we FINALLY were able to get everything in and headed home.  I really thought we might have to return everything and go back and buy it when we had a bigger car!

The balcony is so inviting now that it’s had a furniture face lift.  I love our little balcony and it’s perfect for morning lattes, afternoon drinks, reading and relaxing.  Sophi likes the balcony too … can you see her sneaking into the picture?

Heck the balcony is even great for an intimate dinner and since the weather in DC is not longer 90 plus degrees each night we even had dinner on the balcony the other evening.

Had to squeeze that last Instagram picture into the post :)

Happy Outdoor Living!

Don’t forget to leave your tidbit by commenting and/or add Life’s Tidbits to your RSS Reader :)

Share

I find it odd that I’m perfectly capable of caring for a dog, but give me a plant and the thing is dead in less than a week.  I mean it’s a serious black thumb problem I have.  We offered to water our neighbor’s plants while they were on vacation and I made the husband do it since I was afraid I would instantly kill them all.  Despite my inability to keep plants alive I’ve always wanted to have a little herb garden.  The thing is when I got into cooking recipes would call for fresh herbs.  So I would buy a package of mint, for example, and then only use two tablespoons.  The rest would sit in the refrigerator and go bad in no time.  Those little packages cost like $2 and you can buy a pre-planted herb for $2.99.  The way I see it is my black thumb is not only killing the plants, but my wallet too … hahahaha!

So this weekend the husband and I went herb shopping.  My big thing was I didn’t want to start from seedlings.  Apparently Home Depot doesn’t carry herb plants, only seeds.  I just assumed Home Depot would have them, so when they didn’t we had to go a different route.  We found basil at the grocery store and then chives, mint and parsley at a flower shop.  If I’m able to keep these four herbs alive I plan to add rosemary and thyme to my little “garden”.

We laid down some plastic so the potting soil didn’t get all over the hard woods and started planting the herbs.

When I was done planting the husband and I talked about where we should put our herb plants.  We have this little “balcony” off of our living room, which I’ve never really known what to do with.  A while back I stuck an odd chair out there.  I wouldn’t say it is an eye sour, but not exactly elegant either.  If I am able to keep these herbs alive I think it will be time to say goodbye to the old chair and hello to our herb garden.

But for now a little cohabitation will be going on. I don’t think the chair will mind sharing the space. :)

After only one night my basil is already wilting. I’m praying it perks back up.  This is not exactly the start I was hoping for.

People, please cross your fingers and channel some of your green thumb vibes my way!! I really hope these little guys make it.  Any tips for me on how to keep these little guys alive?

Don’t forget to leave your tidbit by commenting and/or add Life’s Tidbits to your RSS Reader :)

Share

And no we aren’t talking about the book in this post.  Although I have heard fantastic things about the 5o Shades of Grey trilogy; I just haven’t had time to read the books yet. They are at the top of my list after I finish the Book Thief!

Instead we are back to the painting theme of the last few weeks and referring to the 50+ different paints I looked at in various shades of gray for the living room and hallway.  I honestly had no idea that gray could have hints of blue, purple and brown. It’s crazy how one color can have three “looks”.  A color online is different from the color swatch and then the color swatch can look different depending upon lighting and decorations within a room.  It’s really crazy how a color that’s considered neutral can take on a life of its own.  We had to stop looking at color swatches in our old place, because they looked so different in our new place.

While on the search for a living room shade of gray I realized I am somewhat afraid of color as well.  Afraid in the sense that I didn’t want to go too dark and have the walls take over the room.  Then there was the issue of not being able to visualize color sample on the wall painted on the whole wall let alone the entire room.  Despite knowing I was new to painting (as a form of decorating) I was very shocked at how difficult I found it the whole process.  I was all about finding the PERFECT color.

My husband was more than happy to slap whatever version of gray (that made me happy) up on the walls and call it a day.  We ended up purchasing so many sample paints I think the cost was close to a gallon .. oopps.  After 8 colors painted in “small” rectangles on one wall and 2 HUGE nondescript shapes painted on the walls we FINALLY chose our version of gray.

Luckily for me my husband is a taping machine.  I mean honestly taping takes FOREVER! It shocked both of us the amount of time it took him to tape things.  We tried to do a little painting without the tape, but neither of us have steady enough hands for that. :)  It took us a while to figure out how to paint/tape the bulk heads.  At first we thought we’d paint the whole thing the same color, but then I noticed the bottom of the bulk head was painted the same color a the ceiling.  We double checked all three rooms and they were the same.  So we only painted the “walls” of the bulk heads our new color.

Below is the husband checking out his taping handy work.

After much taping and covering up the hardwood floors our living room was ready to be painted!  So we go to it.

After a FULL, long and exhausting day of painting the room was finally done!!!  Despite the tape we still had a few oopsies.  To make sure we would know what to fix the next day we went back to the condo to do the touch ups.  See all the little blue dots … lots of little mistakes.

After doing touch up our living/dining room was ready for our stuff!  Although it took us forever to pick in a color in the end we love it and it was worth the multiple trips to the paint store.  The next weekend we moved into our new place … and all that was left was to unpack …

Happy home improvements!

Don’t forget to leave your tidbit by commenting and/or add Life’s Tidbits to your RSS Reader :)

Share

When the husband and I hosted a Super Bowl party this year a friend made these cute little oreo truffle footballs.  These little guys were extremely addictive.  So yummy!!!!!

Our friend was kind enough to share the recipe with me after a few reminder *wink wink*.  Although I’ve been meaning to make the truffles for a while there hasn’t been a good occasion to give the recipe a try.  We had some friends over this weekend to check out the new place so I made the oreo truffles as a littler treat for  our friend.  They were a big hit!

Ingredients:

1 package oreo cookies (entire cookie including the cream center)
1 8oz. package cream cheese (softened)
white chocolate

Crush cookies in a food processor or place them in a ziploc bag and crush into a fine consistency.

Stir in softened cream cheese.  I had to use my fingers to get it all mixed together well.  The suggestion to use the back of a large spoon to help mash the two together just wasn’t working for me.  Or maybe it was taking too long, but either way my hands were very effective.

Roll the mixture into 1″ balls and place on wax paper covered cookie sheet.  I would actually suggest doing 1/2 inch balls. These little guys are super rich and the 1″ balls is about 2 bites. I think having one bite truffles would have been a little better.

Melt white chocolate as directed on the package and then dip balls into chocolate, tap off extra and set aside on wax paper covered cookie sheet to dry. (Tip:  it helps to freeze the uncoated balls for a few minutes to keep the mixture from starting to fall apart in the melted chocolate.)

Once dry, refrigerate.  This makes about 36 truffles (or 72 if you do the smaller truffles as I suggested).  I mean seriously these are SO easy to make and they taste SOOOO good.

Happy Cooking!

Don’t forget to leave your tidbit by commenting and/or add Life’s Tidbits to your RSS Reader :)

Related Posts Plugin for WordPress, Blogger...
Share