Despite having his and her closets in the master bedroom we didn’t have a place to hang our clothes for the first 3 weeks we lived in our new place.

The husband took out the existing rod and shelf from both closets the weekend before we moved in while we were painting the bedroom.  It took some brute force and a little finessing,  but in the end the closet lost it’s “builder” look.

Here’s a helpful video I found one how to pull out builder closets if you have questions. I made the husband watch the video and concurs with the process.

Then we used putty that goes on pink and drys white. This way we knew that it was 100% dry before sanding it down.

After puttying, letting it dry and then sanding it down we were ready to paint.  We used the Origami White to paint the inside of the closets.  The closets took a lot more paint than I ever would have thought of so we ended up having to buy an extra quart to finish it off. I’m not going to lie, we totally hit the ceiling in a couple places and didn’t bother to touch it up.  I mean really, who looks in your closet, up at the ceiling and then stares looking for slight imperfections – no one, therefore no touch-ups hahaha.

Despite being ready to install our new closet organizers, we hadn’t actually purchased anything.  I considered pulling the trigger on a ClosetMaid and a Rubbermaid closet organizer.  I was having trouble deciding on how to design the closets, which was very much impacting my ability to purchase anything.

Memorial day weekend we FINALLY pulled the trigger and purchased our closet organizers.  After delivery, installation and a little unpacking of the clothes we are all set up with his and her closets!!!

Here’s the thing, my husband’s stuff just doesn’t take up the whole closet.  AND since we don’t have a linen closet, my husband graciously agreed to allow me to put a few additional shelves in his closet for the towels, sheets and extra pillows/blankets.  So of course, back to the store we went to return stuff we didn’t need and purchased a few extra shelves.  Although I wish we had them installed prior to move in, I am absolutely loving our closet organizers!!

His and her closets are complete:

Happy home improvements!

Don’t forget to leave your tidbit by commenting and/or add Life’s Tidbits to your RSS Reader :)

Share

When we toured the condo, we eventually ended up buying, I didn’t notice the cabinets didn’t have hardware on them.  In fact I am not even sure I would have ever noticed they were missing (until we moved in) unless the husband had pointed it out.  At first we assumed the hardware just hadn’t been installed yet; we were wrong.  Apparently the builder purposely didn’t add knobs to the cabinets. In his experience buyers “don’t usually like” the hardware he chooses and therefore all the units in the building come sans knobs in the kitchen.

This missing knobs tidbit also showed up on the report from the home inspector.  The seller agreed to have the hardware installed for us if we purchased and provided the knobs prior to closing.  Knobs were at the very bottom of our to do list in the weeks prior to closing. We had to start packing, work, attend a wedding, travel to NY for a family event and oh so much more. As you can imagine the whole not having hardware in the kitchen didn’t really take precedent.

We had perused knobs at Home Depot, but hadn’t loved anything.  Then the husband found Knobdepot.  Our knobs had to be brushed nickel in order to match the appliances/faucet in the kitchen.  This was kind of nice because it helped us narrow down our choices.  In the end we ended up choosing these.  Modern with a twist {pun intended … hehehehe}.

Since we didn’t get the knobs purchased prior to closing we were either going to have to hire someone to install them or do it ourselves.  My handy husband was pretty convinced he would be able to install the hardware himself.  Our knobs came with a free template, however it wasn’t the right size?!?! I mean really, why send us a free template that is too small for our knobs?  LUCKILY the husband is handy, like I said, and he went ahead and modified the vertical and horizontal template to be usable.

Here’s how they look:

Not so sexy, but extremely effective!

We learned something very important when installing the first knob – drill through the front of the cabinet, not the back. When we drilled from the back to the front there was some splintering on the front of the cabinet :(  Luckily we did the test on a cabinet that isn’t front and center.  Also we added masking tape to the inside of the cabinets to help minimize the splintering on the inside.

Hold the template up to the cabinet door.

Drill a little bit through each of the two holes to make a mark on the cabinet.

Check to make sure the holes are level and then drill through each of the holes.

Screw the knobs onto the cabinet and check that it is level again.  Along the way we made small modifications to the holes to make sure they were level.

After they are all screwed in it looked like this:

I love how the cabinets look.  Since we got use to not having knobs I still find myself grabbing the top of the cabinet to pry it open. I’ve got to start taking advantage of our new bling bling.

Happy home improvements!

Don’t forget to leave your tidbit by commenting below :)

Share

Before buying our condo I had never painted any of the places I had rented.  The only thing I remember painting was a fake wall my roommate and I had (frat boys) put up in the living room of our one bedroom apartment to make it into a two bedroom.  Funny thing about that, my friend and I only painted the part of the wall that wasn’t covered by the couch … can you say college standards?! :)

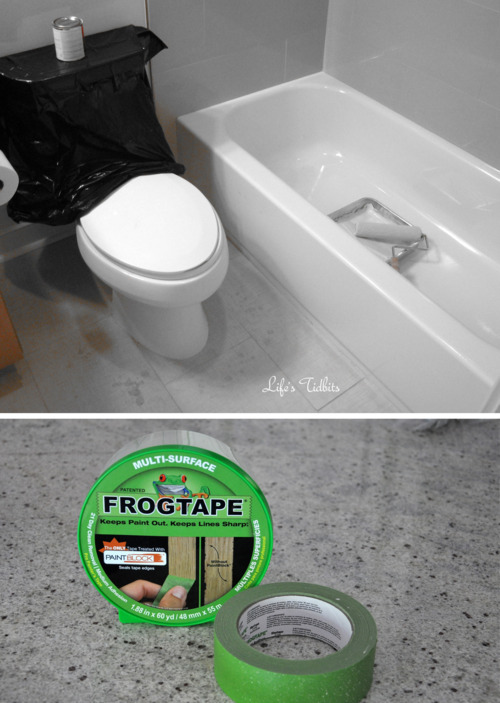
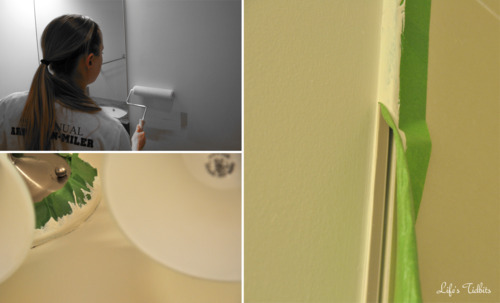
My husband on the other hand has painted before and was good about giving me tips.  He said to only put about an inch of paint into the pan and to make sure the whole roller has paint on it before painting the wall.  Then there was the tip to roll slowly at first to avoid excess paint spraying on things not covered or taped.  These were all great tips!  The one thing neither of us knew was what kind of paint finish is suggested for different rooms.

The counter top in the bathroom has green tones to it so I knew I wanted to go with a green paint in the guest bathroom.  Here’s the first green we considered, but it was too bright for the bathroom:

After slapping two more greens up on the wall there was a clear winner.  I seemed to have missed taking a picture of the other two colors we put on the wall.  We decided on Benjamin Moore Old Prairie (2143-50).  A whole gallon wasn’t necessary for a small bathroom so I was to buy a half gallon (two quarts really since a half gallon wasn’t an option at this particular store).  The first Saturday after becoming homeowners my husband was busy taping and prepping the condo to be painted.  Therefore I was on go to the store/run errands duty. Off I went to the store feeling really good about what I needed to buy.

The man at the store was less than helpful. He started by trying to up-sell me and I got completely confused on what I needed/wanted.  Eventually he took my order for the paint and then asked what finish I wanted. I said “ummmm well ….” to which he handed me a finish card to look at. I immediately remembered my friend saying samples come in flat, but get eggshell when you actually paint.  Done and done, paint mixed and purchased.

While I was gone my husband taped the bathroom and got it ready to be painted.

When I got home we painted the bathroom our new light green color.  On my next trip that same day to the same paint store to buy paint for the master bedroom, I overheard someone talking about which finish to use for the different rooms.  Keep in mind this information wasn’t on the finish card and the guy helping me didn’t offer up any narrative as to what finish to use.  As I hear the words bathroom and semi-gloss in the same sentence I start to freak out.  Have we just painted the bathroom the with the wrong finish??

When I got back to the new place I shared this tidbit with my husband. Out comes the iphone and Googling begins. Sure enough we painted the bathroom with the wrong finish.  We debated if we should spend the money and the time to repaint the bathroom the same color but in semi-gloss or just go with what we already had on the wall.

In the end back to the paint store we went to purchase a quart of the semi-gloss.  Apparently even a 1/2 gallon was too much paint for the guest bathroom.  Since the bathroom was still taped we decided it was best to repaint the room now.  Doing it right now would save us the hassle of repainting the room in 6 months if the eggshell wasn’t holding up well.

The repainting took less time since there was already a base coat on the walls.  In the end I actually liked the look of the semi-gloss better than the eggshell in the bathroom.  I’m SOOO glad we took the time (and money) to correct the painting finish error.

The husband did a great job on the taping and when we pulled the tap off the lines looked fantastic!

Interested in learning about what paint finish is suggested for each room? Click here for details about paint finishes. This website would have come in handy if we had done some research before slapping paint up on the wall!!  Lesson learned. :)

Guest bathroom painting completed … master bedroom, master bathroom and living/dining room as well as hallways to go.  Painting is time consuming, but the place is starting to have a more homey feel to it!!  Now we just need a shower curtain, mat and accessories and the guest bath will be complete.

Happy painting!

Have you had any similar painting mishaps?

Don’t forget to leave your tidbit by commenting below :)

Share

Big, BIG things happening for us as of late.  Apparently we don’t know how to do low key/boring. :)

2010 – Engagement
2011 – Wedding/Honeymoon
2012 – PURCHASE OUR FIRST HOME!!!!!!!!!!
2013 – ??? I’m sure we will find something to spice things up next year!

Remember back in February when we turned 30 and went on our lovely trip to Mexico? Well the day before we left for vacation we found out the owner of the condo we rent is planning to sell.  What did this mean for us? Well it meant we had to move and do it within the next few months.  STRESSFUL! The thought that we would need to move, or that our apartment would be sold, was nowhere on our radar.

We had planned on building up our saving account a little more and then purchasing our first home.  The plan was to move at the end of the summer (or possibly early 2013).  With the news of an impending sale coming our way, the purchasing timeline was moved up.  Our move out date was no longer being driven by our savings account but by our current landlord’s desire to sell.

Despite our initial freakout everything has worked out pretty well.  We have a friend who’s a realtor so we called him the day we found out about needing to move and he got us hooked up with the lender that afternoon.  Within a week of coming back from vacation we were preapproved for a place and ready to start the big search.

While we were drinking margaritas and relaxing on the beach the husband and I came up with our must have and like to have lists for our first home.

Here is what our list looked like in order of priority …

Must Haves:

  1. Within our ideal price range
  2. In DC (not Maryland or Virginia)
  3. Pet Friendly – we can’t part with little Miss. Sophi!
  4. 2 bedrooms
  5. Washer/Dryer
  6. Walking distance to a metro

Like to Haves:

  1. Parking Space
  2. Plenty of Storage
  3. 1.5 or 2 bathrooms
  4. Patio and/or balcony
  5. Fireplace

I felt like this was a pretty good list to begin with and began stalking RedFin for listings. After looking at a few condos in person, our must have list started to change a little.  We quickly realized a large living/dining area was important to us.  Small bedrooms were okay as long as the living space was big.  I feel like I do two to three things in the bedroom.  Sleep, get dressed and watch tv. I don’t need a massive amount of space for any of those.  Also, it became very clear places under ~800 sq feet were just too small.  As it turns out the one bedroom we rent is slightly over ~800 square feet so when you add a second bedroom but don’t increase the size of the unit the living space shrinks considerably.  TIP: find out the square footage of your current place before you start looking at places (to rent or buy).  This  will help you to gauge what square footage is ideal for you.

After viewing at least 20+ places in person and probably over 100 online we ended up putting an offer in and after a week of negotiations the place was officially UNDER CONTRACT.  WOOT WOO!!!

Based on our initial list we end up with the following:

Must Haves:

  1. Within our ideal price range – FAIL we went over the initial budget
  2. In DC (not Maryland or Virginia) – CHECK
  3. Pet Friendly – CHECK
  4. 2 bedrooms – CHECK
  5. Washer/Dryer – CHECK
  6. Walking distance to a metro – CHECK

Like to Haves:

  1. Parking Space – Fail
  2. Plenty of Storage – Fail … well kind of.
  3. 1.5 or 2 bathrooms – CHECK
  4. Patio and/or balcony – CHECK
  5. Fireplace – Fail

PLUS our living/dining room is HUGE and get a ton of natural light, win win!!  Overall I would say we made out VERY well with our first homeowner purchase.

Looking back at the process here are a few things I think we did right and a few more I wish we had done:

  • Go with your gut. If you love it then you love it and if you don’t there are always more places coming onto the market so don’t settle.  For those of you who purchased a wedding dress and had “this is THE dress” moment that will happen for your home too!
  • View a lot of places and even take a look at places you aren’t sure look great online. Not all places photograph well (or the owner just puts up crappy pictures).  We found a few I wasn’t sure about online and then really liked in person.
  • Remember the paint color (or wallpaper) can always be changed!
  • Determine what the deal breakers are. For example I hated when the second bedroom didn’t have a window (which didn’t come to light until we saw a few places like this).  It didn’t bother my husband, but we agreed when things are a deal breaker for one of us then the place is out.
  • Figuring out what you can afford and comfortable spending BEFORE you start looking and don’t look out places above your price range.  I mean let’s be honest if you find a place for 100k that you like, but then look at a place for 500k 9 times out of 10 you are going to like the more expensive place.  Just don’t tease yourself it isn’t worth it I promise (same thing goes for wedding dress brides!!!).
  • Going back to the first choice place at least once before putting in an offer or shortly there after. It felt so good to walk into the condo and confirm I LOVED it.
  • Getting the paperwork in order while looking for a place. I wish I had asked the Lender for a list of the paperwork we were going to need to provide (bank statements, w-2s, paychecks, etc) to get fully approved.  The documents takes a while to compile and if you are like me, you might have forgotten how to access some of your 401k accounts online.
  • Don’t take the negotiations personally.  The seller wants the highest price possible and you want the lowest.  Some back and forth is to be expected.  We had a hard time with this because we felt our initial offer was very reasonable/fair.

And remember to RELAX and try to ENJOY purchasing your first home!!

Related blogs coming up soon: Moving, painting and other homeownership related projects.

What tips do you have for a first time home buyer?  Do you have any pre-move in tips for us?

Don’t forget to leave your tidbit by commenting below :)

Related Posts Plugin for WordPress, Blogger...
Share