After getting the DIY baby shower invites out the next thing to tackle was the menu and the decorations.  The mom-to-be and I have always joked that she is never lacking black and white outfits.  I figured a black and white color scheme would be perfect and wouldn’t you know it my friend wore a black and white outfit to her shower without even knowing the color scheme!!!  I guess I know my friend pretty well. =)

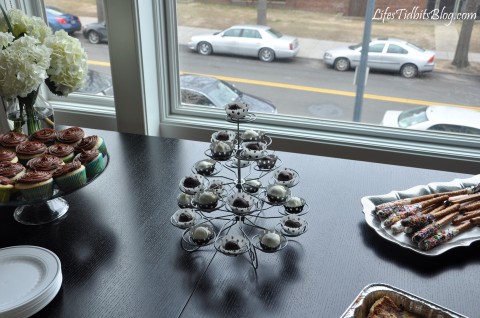
The brunch menu came together quickly.  Although there was definitely too many sweets in the end with a good amount of left over, but who doesn’t like left over Oreo truffles?!?!  I was pretty pleased with the variety of options for the brunch.  Everyone came hungry so there wasn’t a crazy amount of left overs.

Little Man Brunch menu included:

  • Egg Soufflé
  • Pumpkin Bread
  • Fruit Platter
  • Cheese Plate
  • French Toast Casserole
  • Turkey Meatballs in red sauce
  • Oreo Truffles
  • Cigars (aka chocolate covered pretzels)
  • Yellow Cupcakes with Chocolate Buttercream Frosting

We kept the party decorations pretty simple.  A bunch of black and white balloons, two flower vases, onesies and then a few little mustache details to bring everything together.

Unless otherwise noted all pictures were taken by Sara from Photos from the Harty.

Initially I bought some 3-6 month onsies and quickly realized they are SO tiny the iron-ons wouldn’t look so great on them.  I used one 3-6 month onsie for the bow tie (middle) the other two are 12 month onsies.

To supplement the balloons, onsies and mustache details there were two hydrangea flower arrangements.  I feel like I somehow involuntarily collect vases so it was easy to find two that were pretty much the same.  Put some white and black decorative stones in the bottom, add water and the flowers … voila a “DIY” center pieces!

The paper straws and mustache cups were a big hit.  These were probably my favorite detail.  I’ve become slightly obsessed with the paper straws.  There were purple barbershop straws at our wedding and yellow ones for the husband’s 30th birthday party.  The truth is I might never throw another party without them hahaha.  Seriously all parties will have barbershop straws!

We played two shower games.  The first was “How big is mommy’s tummy?”.  I look awfully serious measuring how many toilet paper squares Rebecca’s belly is.  I love the picture to the right as she counts the square … all smiles!!!

Next up was the poppy diaper game.  I was surprised at how stumped everyone was trying to figure out what type of candy bars were in the diapers.  The hardest one was the dark chocolate milky way … apparently the dark chocolate really threw everyone off.  And let me just say that the butterfinger game me a run for my money.  That candy bar was HARD to melt!

Thanks to all the beautiful ladies who came to shower the mom-to-be and her little man!

I put the party favors (with the DIY tags) on a platter and placed them by the front door.  I had to remind people to take them as I didn’t want 14 lollipops for myself!  I think they were a big hit and displaying them during the party added to the decorations.

A big thank you to Sara from Photos from the Harty for taking pictures at party!!

Thanks for combing on over for this Little Man baby shower.  What’s your favorite detail?

Happy Party Planning!

If you like this post, please add your tidbit by commenting below and/or add Life’s Tidbits to your RSS Reader :)

Share

When I decided to throw my friend’s baby shower I immediately started searching Pinterest and Google for inspiration.  I quickly fell in love with all the details of “Little Man” aka “Mustache” baby shower / birthday parties I found.

With the theme chosen the search for an invitation began.  Although initially the plan was to purchase pre-made invitations, I soon decided to try my hand at designing my own invitation.  I figured if the design wasn’t nailed down in time I could always order one of the many available options.

The invite was created PhotoShop and the mustache graphics purchased from ShutterStock.  It took a number of iterations, but the end result was exactly what I had envisioned!  Although I had successfully DIY’ed our wedding invitations, I wasn’t sure I would have success with baby shower invites.  Before revealing the final product to my husband, parents and sister I made them promise to give me their brutally honest opinions.  With their stamp of approval I moved forward with ordering the baby shower invites from Overnight Prints.

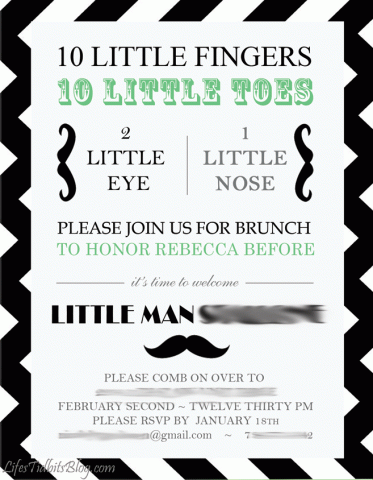
Font of the Invitation (JPEG Version):

DIY Little Man / Mustache Baby Shower Invitation |  Life's Tidbits

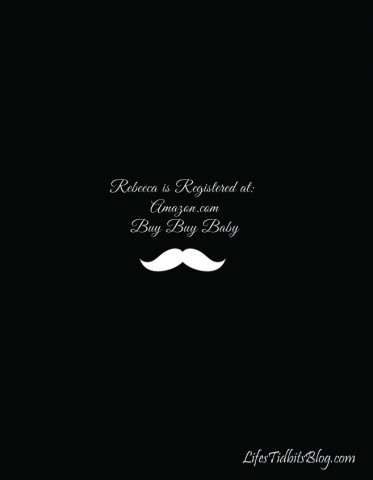
Back of the Invitation (JPEG Version):

DIY Little Man / Mustache Baby Shower Invitation |  Life's Tidbits

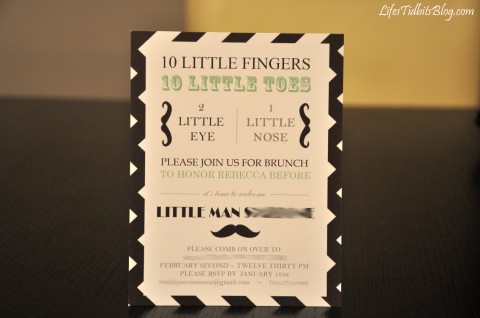
When they arrived in the mail I was ecstatic and hopeful the printed version would meet my expectations.  I was very pleased with the quality of the paper, printing and turnaround time of my order!  I kind of wish they looked a little shiny and/or glossy, but the matted is probably for the best.

DIY Little Man / Mustache Baby Shower Invitation |  Life's Tidbits

In an effort to save myself time, as well as spare everyone my horrible handwriting, I reused my DIY wedding calligraphy directions to print the address and return address on all the envelopes.  The font for the addresses is Lucida Calligraphy, which is a free font.

The invitations/envelopes are completed and in the mail.  Now it’s time to focus on finalizing the decorations, menu and shower games for the shower!!

So I mustache you … what do you think of the DIY baby shower invitations?

Happy DIY!

If you liked this post, please add your tidbit by commenting below!

Share

It seems we have come to the end of the wedding related posts.  I’ve shared my bridal shower and the bachelorette party as well as my wedding dress purchasing experience.  And let’s not forget about it pouring down rain only a few hours before what was suppose to be an outdoor ceremony.  Below I’ve listed all of the DIY projects we tackled along the way as well as the vendors we used.

But before we get to that here are just a few of my favorite pictures from the big day!  All of the photos below were taken by Korie Lynn Photography.

How cool is that detail shot?!?!  The pearl bracelet was HANDMADE by my Aunt!  I couldn’t find what I wanted so she made me the most perfect bracelet I could have ever imagined.

I had always dreamed of getting a picture in front of the white house and this was the perfect shot.  Luckily the rain held off until after this picture was snapped :)

This was taken in the lobby of the St. Regis a little while before the ceremony.  We had time to squeeze in a couple more photos so I suggested the purple couch since it matched our wedding colors.  I love that we are all smiles!

And last but certainly not least the picture above!  There I am between the two most important men in my whole life!  My husband to the left and my Dad to the right.  Not to mention all the special faces I can pick out in the crowd behind us.

Okay so there are some of the top pictures of the evening now for the roundup …

DIY Projects:

  1. Invitations
  2. Envelope Calligraphy
  3. Rehearsal Dinner Invites
  4. Escort Cards
  5. Table #s, Stamps and Thank You Cards
  6. Candy Buffet/Bar
  7. Menu Cards

Vendors:

Ceremony/Reception Venue: St. Regis Hotel
Photographer: Korie Lynn Photography
Floral Designer: MultiFlor
Band: ‘Round Midnight
Videographer: Suburban Video
Hair: George Salon
Makeup: Go Go Gorgeous
Wedding Dress: Stephen Yerick
Bridesmaids Dresses: Lazzaro
Groomsmen: Joseph A Bank

Oh and just in case you missed it we spent our honeymoon in Italy – Positano, Sorrento, Cinque Terre and Rome.

Happy Wedding Planning!!

Don’t forget to leave your tidbit by commenting and/or add Life’s Tidbits to your RSS Reader :)

Share

During the wedding planning process I started reading a lot of blogs.  Sooooo many brides were doing DIY projects.  The wedding blogs really got my planning/artistic juices flowing.  I would read about how simple it is to make X all on your own and immediately I would want to take on the DIY project.  I would gently remind myself I am not the artist in the family, that would be my sister, the MOH.

My friend from work was kind enough to share A LOT and I really mean A LOT of her wedding/party planning expertise with me.  One of her suggestions was to check out her friend’s blog called Aisle with Style.  As I was browsing the posts I found a post for the wedding invitations my friend had done for her brother’s wedding.  When I stumbled upon the blog post I instantly wanted to make my own invitations.  I emailed my friend and asked her for the details on the invitations she made for her sister-in-law’s wedding.  Then I forwarded the post to my then fiance and mother.

Both liked the invitations; however neither was excited about the DIY part.  My husband was very concerned about hidden costs of DIY as well as the time it would take us to do the invites.  I started pricing out invitations online.  The non diy invitations would still cost a pretty penny even from the online vendors I found.  While visiting my parents for Thanksgiving we spent sometime doing wedding stuff.  Sunday we went with my mom to register at Bloomingdale’s.  There just happen to be a paper/invitation store in the same complex so we stopped in to check out the invitation designs as well as pricing.  As I had assured both my mother and husband the invitations were expensive! Both were finally, mostly, on board with a little (or a lot as the case maybe be) DIY action.

After purchasing the paper and the pretty purple envelopes.  I could barely contain my excitement.  There was only one issue, I had a super old version of PhotoShop and it wasn’t compatible with a lot of the new functionality.  My husband to the rescue!  He quickly jumped onto his computer and downloaded a 30 day trial version of the newest PhotoShop version.  And then the fun began. YAY!

I spent many hours camped out on the couch, watching tv and and cutting our invitations and insert cards down to size.  Below is a little picture of how I totally took over the coffee table to create our invitations.

In the end we had three pieces to our wedding invitations – the invitations, room block insert card and rsvp post card insert.

After completing all the invitation the next step was to do the envelopes.  Check out our DIY invitation calligraphy here.  We also made custom stamps for our wedding invitations, which you can see here.

My tips for a successfully DIY invitation:

1)  Buy a paper cutter.  A good paper cutter is essential for straight lines and a sharp blade is ideal so the edges don’t fray.

2)  Make one complete invitation before printing 100 copies.  When I made my inserts I didn’t put it all together until I had printed multiple copies. I think realized the Room Block and RSVP text was way to big and had to reprint.  Waste of paper and time.

3)  Print High resolution.  I printed the 1st few on standard.  They looked nice, but when the husband took over the printing press he printed on High (he had no idea what setting I had used) the colors popped more and so we had to re-print the ones I had initially printed.

4)  Buy extra paper.  I suggest printing on regular white paper for a while until you think it is right.  See #2 and #3 I needed extra paper because of small modifications and printer settings.

5)  Start early.  Everyone laughed when I started my invitations 8 months out. But I wasn’t motivated some days or just plain didn’t have time.  Giving myself a lot of time to complete the project reduced my stress level and made it more fun.

Happy DIY!

Don’t forget to leave your tidbit by commenting and/or add Life’s Tidbits to your RSS Reader :)

Share

I know I am a bad blogger and I still haven’t told you about how we made our own wedding invitations, but that DIY project was a HUGE undertaking. Honestly, I’m not completely sure how to walk you through the process step by step … YET.  So instead I started thinking maybe I would just begin by sharing our DIY rehearsal dinner invitations.

After determining the location, invite list and all that fun stuff for the rehearsal dinner I decided we (the husband and I) should DIY own rehearsal dinner invites.  We had left over card stock from the wedding invite inserts as well as extra envelopes (from our DIY Calligraphy).  I mean it would have been such a waste not to take advantage of the left over paper materials, right?!?!?! ;)

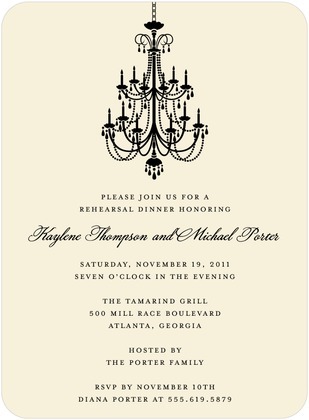
Early on I found Wedding Paper Divas. They have fabulous invitations for various occasions, in fact it is the website we purchased our save the dates from.  I quickly found this rehearsal invitation, which served as my inspiration for our DIY invites.

Image Credit: Wedding Paper Divas

What you need:

Photoshop has a 30 day FREE trail you can download.  We used a 30 day trial to create the initial draft of our wedding invitations. In the end we ended up purchasing Photoshop.  We planned to use it not only for wedding stuff, but also for my budding photography hobby!  If you plan to go the 30 day trial route, make sure to save the final version of your invitation as a PSD, JPG and TIFF file. This will ensure you are able to print the design even after your trail expires.

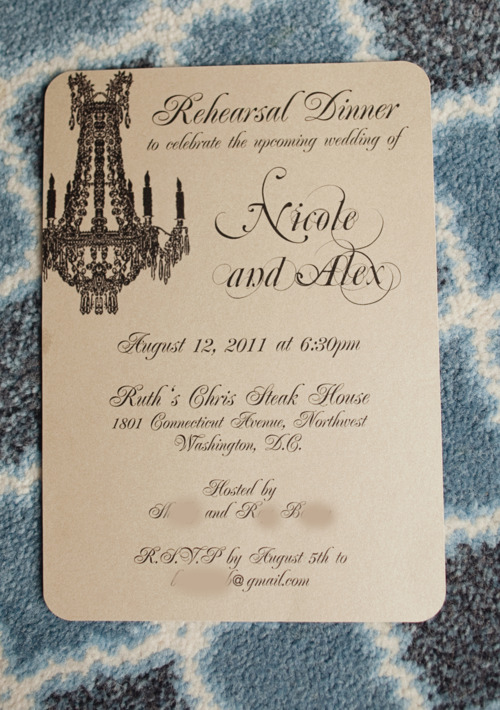
To ensure we could use some of our left over envelopes, I knew the invitations would need to be 5×7.  Once I had the size I found a free image online of a chandelier and downloaded it. From there I Googled rehearsal dinner text and placed it on the initial version of the invite.  After that it was just a matter of finding a layout we liked as well as fonts.

The majority of the text is in a renaissance font, which is free to download!  Then for our names I used the same font we used on our invitations for our names, again a free font you can download.  I felt using a little of the same font as the wedding invitations tied everything together.

I didn’t take a lot of pictures of the process, which is a bummer, so I can only really describe what I did.  I printed two invites on each piece of card stock and then used my handy dandy paper cutter to make them 5×7. I printed a number of test versions on plain paper before using the card stock.

This is one of the test versions, please excuse the crappy blackberry camera shot:

I had printed almost all of the rehearsal dinner invites when I remembered I had purchased a paper rounder punch. I decided to go ahead and use one of my test invites and round the corners to see how it looked.  I ended up loving it and the husband was in agreement.  A bunch of punches later we had rounded edges instead of sharp corners.

Here’s what the rehearsal dinner invitation looked like totally finished:

Here are a couple of extra tips:

  1. SPELL CHECK!
  2. Print test versions on plain white paper before doing a sample on your nice card stock.
  3. Print using High resolution.
  4. Make sure you have enough paper.  You will need extra for test prints as well as if you detect a mistake. Or if like me your ink cartridge starts to die so some invites are better than others.
  5. Start early.  Even though you don’t have to print as many rehearsal dinner invitations as wedding invites (usually) they still take time.  Better not to be up against a deadline.

Happy Planning!

Don’t forget to leave your tidbit by commenting below :)

Related Posts Plugin for WordPress, Blogger...
Share